
We admit that we are NOT crafty ladies. So… Renee Krohn from RenKroDesigns provided us with our first Crafts & DIY Project. How awesome is this? It is family friendly, eco-friendly project. We are going to learn how to upcycle CDs into woven coasters!
Why Upcycle CD into Woven Coasters
In a world of streaming services for music, the CD has gone the way of cassette tapes. If you are like me, you had towers of those things taking up space. But what to do with them? The thrift stores did not really want them, and they are not quite old enough to be a collector’s item like vinyl records are. *GASP* As I sat there about ready to fill the garbage can with plastic nostalgia, a deep nagging reminder hit that I was also raised to take care of the environment. Okay, maybe there was no deep nagging reminder, but I did think there had to be something I could do with them rather than just toss them into a landfill.
Once I brought them back into my studio, I found that I had a lot of these shiny discs. They were iridescent, shiny, and cast rainbows on the wall when the sun hit just right. They also reminded me of the frames I used to make woven rugs.
Could I weave on a CD? YES, I certainly can. The concepts are very similar to weaving on a larger circle but are much simpler and the work is done fast so you can enjoy your creation. Yeah but what do I DO with them once I wove on them? The idea came to me as I reminded my teenage child for the millionth time to grab a coaster for his pop can on the end table. A-HA! Woven coasters!
Supplies Needed
The supplies are cheap, and I am sure you have some of them around your house already.
You will need: CDs (1 per project), Yarn in different colors, a plastic craft needle, and scissors
How to Weave
Take a piece of yard that is about 6 ft long. That is the about 3 arm lengths on an average adult. This is for the spokes. Tie a knot on the back of the CD – use a double or square knot to keep it from slipping. Wrap the yarn around the CD making sure you have an odd number of strands and fish the tail to the back side of the CD.


The front should look like this.
 Take one of your colored pieces of yarn and cut a piece about the length of your arm. This is a good length because it does not get tangled when you are weaving. Thread an end of the colored yard through the back and tie it to the tail of your spoke yarn.
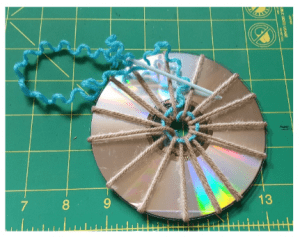
Thread the other end onto the plastic craft needle – smaller kiddos may need help with this. Run the needle through a few of the spokes on the backside to help hold it in place then come up through the center of the CD to the front.

To start weaving, take your needle and go under one spoke and over the next. Repeat this pattern for a few spokes and pull your thread through.

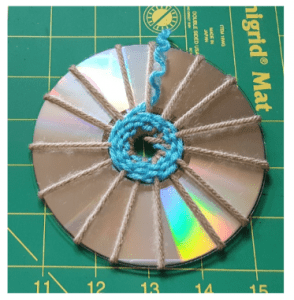
Keep going all the way around until you get back to your starting point. Since you went under to start round 1, you will go over for the start of round 2.
Keep this alternating pattern going around until you have a tail left of your first color – about 1-2 inches.
Pick your next color of yarn, tie it to the tail and keep weaving. Just tuck any knots, yarn tails back into your weaving. As you work around try to keep the spokes evenly spaced so that your design stays even.

Since you are making a coaster, you can weave all the way to the edge of the disc. When you are finished, weave the remaining tail of yarn into the back of the coaster and tie off.

You can make a lot of these super-fast and save all your wood furniture.

Upcycle mini lesson and coaster created by RenKroDesigns
Check out more Eco-friendly artwork and ideas on Facebook @RenKroDesigns or Instagram @RenKroDesigns
